CI/CD is a development practice that delivers software to the end user with speed and reliability. This is important for any kind of app be it web, mobile, console or desktop. In this post we will discuss how we can setup CI/CD for an Android Application using Github Actions.
Before we jump on to the implementation let us discuss a little about CI/CD first.
What is Continuous Integration?
Continuous Integration says that developers in the team should merge their code changes to a central branch as often as possible. These changes are validated using an automated integration process which generates a build and runs the automated tests against it. This helps in figuring out any integration issues early in the development cycle instead of waiting for the release day to merge all the changes.
What is Continuous Delivery?
Continuous Delivery says that every code change which has passed through the integration process can be deployed to test/production environment in an automated fashion or with least human intervention.
CI/CD for Android App
Setting up CI/CD for Android application is simple with tools like Github Actions. Github Action provides you with all the features and tools necessary to build and test an Android app.
Pipeline Architecure
Now let us design our CI/CD flow so that we are clear what we want to achieve. For any Android project I would recommend the following steps:
- Android Lint Check
- Unit Tests
- Instrumentation Tests
- Static Code Analysis
- Packaging
- Functional Tests
- Deployment
There can be more checks like checking the libraries for any vulenerabilities or adding a check to make sure that secrets are not checked into the code. Your team would be the best judge to finalize the CI/CD steps.
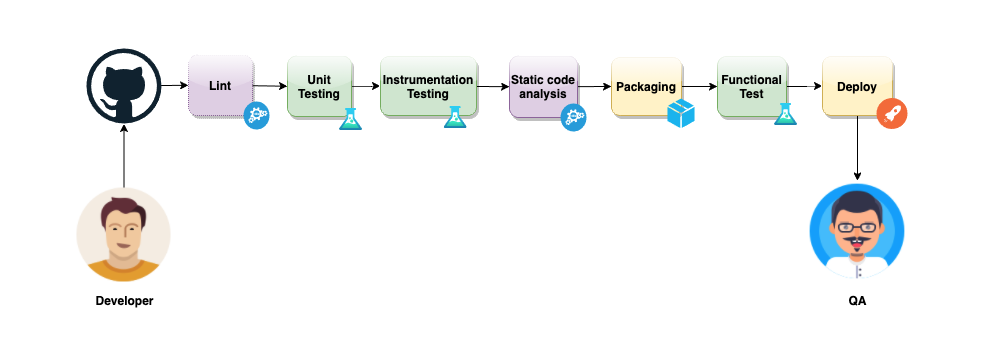
The whole process starts when a developer pushes the code to the centeral Github repository. The moment code is pushed, the CI/CD process will kick in. First it will run a lint check to make sure we are following the Android’s guidelines for coding. After that we will run unit and intrumentation tests. Then we will run a static code analysis using Sonarqube to catch any code smells introduced in the code base.
After we are done with initial checks we will create the APK file and provide it to the Functional Tests. Once the Functional Tests pass, we will Deploy the APK to a place where its available to QAs for testing.
Here is a detailed video that explains the architecture in more depth.
Now let us start building above checks using Github Actions.
Setup Github Actions for your repository
To add Github Actions to your repository you need to create a yaml file your_repo/.github/workflows/ci.yml
The first thing that you need to define in the ci.yml is the events on which you want to trigger your workflow. In below configuration we are running the build whenever there is a push on main branch or when someone creates a pull request against main branch.
All the code that you see in this post is available on github.
1
2
3
4
5
6
name: CI
on:
  push:
    branches: [ main ]
  pull_request:
    branches: [ main ]
Android Lint Check
Now that our basic configuration is in place, we will add Lint check as our first job. Let us understand what the following configuration does.
Step 1: runs-on: ubuntu-latest tells to run the job on latest ubuntu machine.
Step 2: actions/checkout@v2 action checks out the codebase on the machine
Step 3: Once we have the codebase on the machine, run ./gradlew lintDebug
Step 4: Publish the lint report as a github artifact
1
2
3
4
5
6
7
8
9
10
11
12
13
14
15
jobs:
  lint:
    runs-on: ubuntu-latest
    steps:
      - name: Checkout the code
        uses: actions/checkout@v2

      - name: Run lint
        run: ./gradlew lintDebug

      - name: Upload html test report
        uses: actions/upload-artifact@v2
        with:
          name: lint.html
          path: app/build/reports/lint-results-debug.html
Here is a detailed video which shows the whole process of adding lint check in depth.
Android Unit Tests
Our second job would be to run the unit tests. This job will run after the lint job and that is why you see needs: [lint] in the below config. We have already understood how to mention the machine and check out the codebase, let us just talk about the step 3 and 4.
Step 3: Run ./gradlew test will run the unit tests
Step 4: Publish the test report folder as a github artifact
We need to publish the entire folder because we need all the files in app/build/reports/tests/testDebugUnitTest/ folder to navigate through the html report.
1
2
3
4
5
6
7
8
9
10
11
12
13
14
15
  unit-test:
    needs: [lint]
    runs-on: ubuntu-latest
    steps:
      - name: Checkout the code
        uses: actions/checkout@v2

      - name: Run tests
        run: ./gradlew test

      - name: Upload test report
        uses: actions/upload-artifact@v2
        with:
          name: unit_test_report
          path: app/build/reports/tests/testDebugUnitTest/
Below is the detailed video which shows adding and running the unit tests in action.
Android Instrumentation Tests
Our 3rd job would run Android instrumentation tests. To ensure that it runs after unit tests we have added needs: [unit-test].
You would notice that we are running this job on mac-latest machine. That is because the modern Intel Atom (x86 and x86_64) emulators require hardware acceleration from the host to run fast.
The macOS VM provided by GitHub Actions has HAXM installed so we are able to create a new AVD instance, launch an emulator with hardware acceleration, and run our Android tests directly on the VM.
Most of the steps we have already discussed in above configurations. The only thing we are doing extra is to start the android emulator using reactivecircus/android-emulator-runner@v2 and running the instrumentation tests using ./gradlew connectedCheck.
1
2
3
4
5
6
7
8
9
10
11
12
13
14
15
16
17
18
  instrumentation-test:
    needs: [unit-test]
    runs-on: macos-latest
    steps:
      - name: Checkout the code
        uses: actions/checkout@v2

      - name: Run espresso tests
        uses: reactivecircus/android-emulator-runner@v2
        with:
          api-level: 29
          script: ./gradlew connectedCheck

      - name: Upload test report
        uses: actions/upload-artifact@v2
        with:
          name: instrumentation_test_report
          path: app/build/reports/androidTests/connected/
You can find all of it in action in below video.
Static Code Analysis
As part of our next job we will run static code analysis using Sonarqube. For this you need to setup your sonarqube server or use SonarCloud. In this case I have used SonarCloud to publish the analysis results.
The minimum version required for sonar scanner is Java 11 and that is why you see a step to setup Java 11 jdk on the machine. Lastly we run the ./gradlew app:sonarqube command to run the sonar scanner. You can see that we are also providing the SONAR_TOKEN which is required to connect with SonarCloud. Also we need to provide the GITHUB_TOKEN token in the environment variable to publish the code from Github to SonarCloud.
1
2
3
4
5
6
7
8
9
10
11
12
13
14
15
16
  static-code-analysis:
    needs: [instrumentation-test]
    runs-on: ubuntu-latest
    steps:
      - name: Checkout the code
        uses: actions/checkout@v2

      - name: set up JDK 11
        uses: actions/setup-java@v1
        with:
          java-version: 11

      - name: SonarCloud Scan
        run: ./gradlew app:sonarqube -Dsonar.login=${{ secrets.SONAR_TOKEN }}
        env:
          GITHUB_TOKEN: ${{ secrets.GITHUB_TOKEN }}
You can generate the Sonar token using SonarCloud portal. You can watch below video to understand how to setup sonarqube for your project and how the reports will look like on SonarCloud.
Generating APK file
Package job will run after the static code analysis. Here we will create apk file using our gradle command and upload it as github artifcat.
1
2
3
4
5
6
7
8
9
10
11
12
13
14
15
16
17
18
19
20
21
  package:
    needs: [static-code-analysis]
    name: Generate APK
    runs-on: ubuntu-latest
    steps:
      - name: Checkout the code
        uses: actions/checkout@v2

      - name: set up JDK 1.8
        uses: actions/setup-java@v1
        with:
          java-version: 1.8

      - name: Build debug APK
        run: ./gradlew assembleDebug

      - name: Upload APK
        uses: actions/upload-artifact@v2
        with:
          name: expense-manager.apk
          path: app/build/outputs/apk/debug/app-debug.apk
You can see all about generating apk in below video.
Deploy to App Center
Finally we will deploy the apk file to app center so that it’s available for testing. We will use App Center to deploy our app.
First we need to download the apk from the package job. Then we will upload the apk to app center. Do checkout wzieba/AppCenter-Github-Action@v1 for all the available options for configuring the upload task.
The APP_CENTER_TOKEN can be generated from the App Center portal. Once you generate the token, add it to the secrets of your github repository.
Once your app is uploaded to App Center, app center will automatically send out an email notification to all the members of AlphaTesters group as mentioned in the below configuration.
1
2
3
4
5
6
7
8
9
10
11
12
13
14
15
16
17
18
19
  deploy:
    needs: [package]
    name: Distribut For Alpha Testing
    runs-on: ubuntu-latest
    steps:
      - name: Download latest artifact
        uses: actions/download-artifact@v2
        with:
          name: expense-manager.apk

      - name: Upload to app center
        uses: wzieba/AppCenter-Github-Action@v1
        with:
          appName: ajitsing/Expense-Manager
          token:  ${{ secrets.APP_CENTER_TOKEN }}
          group: AlphaTesters
          file: expense-manager.apk
          notifyTesters: true
          debug: true
Functional tests are not covered as part of this post because there are a lot of frameworks available to write functional tests like appium, calabash etc. And you can find a lot of posts covering this specific topic. Still if you want me to cover this topic as well, do let me know in the comments below.
That’s all folks. Thank you!