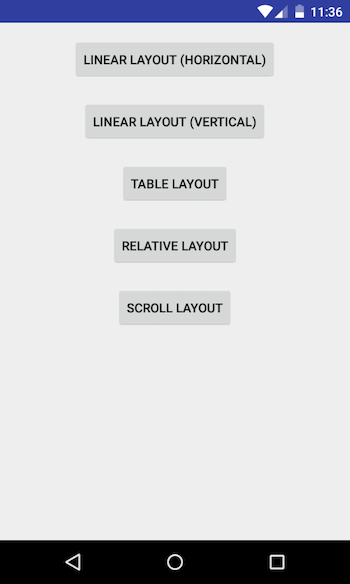
This article covers the basic Android UI which every android developer should know. Here we will discuss what are the basic android UI building blocks and how they can be used. With a little attention you can master the basics of android UI design. I have created a demo application to help learn the basics. You can look at the code on github.
Android UI has two main classes View and ViewGroup.
View
This is the base class for all the android UI components. It has its own appearance. Examples of View are TextView, EditTextView etc.
ViewGroup
It is a special type of View which can hold multiple Views. The ViewGroup class also implements LayoutParams which are used to configure the viewgroup. Few examples of ViewGroups are LinearLayout, RelativeLayout etc. Following are the mostly used ViewGroups.
- LinearLayout
- RelativeLayout
- AbsoluteLayout (Deprecated use RelativeLayout instead)
- TableLayout
- ScrollView
- FrameLayout
LinearLayout
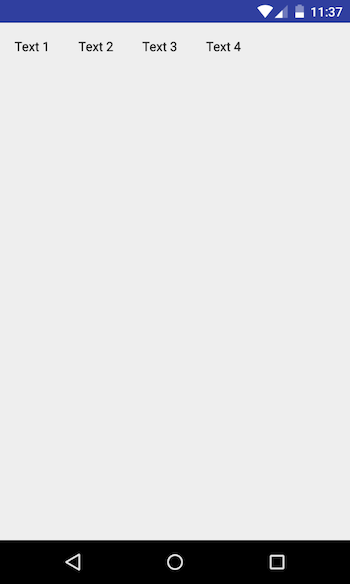
A layout that arranges its children in a single row or column. It can be used when you want to arrange yours views in vertical or horizontal manner.
Attributes of LinearLayout
android:orientation - This attribute can have 2 values horizontal or vertical. Configure the value according to your design needs. android:layout_width - This attribute is mandatory for all the ViewGroups. This tells how much width can be occupied by the Views inside this ViewGroup. android:layout_height - This attribute is also mandatory for all the ViewGroups. This tells how much height can be covered by the Views inside this ViewGroup.
Example
1
2
3
4
5
6
7
8
9
10
11
12
13
14
15
16
17
18
19
20
21
22
23
24
25
26
27
28
29
30
31
32
33
<?xml version="1.0" encoding="utf-8"?>
<LinearLayout
    xmlns:android="http://schemas.android.com/apk/res/android"
    xmlns:tools="http://schemas.android.com/tools"
    android:layout_width="match_parent"
    android:layout_height="match_parent"
    android:orientation="horizontal"
    tools:context="ajitsingh.com.androiduiplayground.DemoActivity">

    <TextView
        android:layout_width="70dp"
        android:layout_height="wrap_content"
        android:textColor="@color/primary_dark_material_dark"
        android:text="Text 1"/>

    <TextView
        android:layout_width="70dp"
        android:layout_height="wrap_content"
        android:textColor="@color/primary_dark_material_dark"
        android:text="Text 2"/>

    <TextView
        android:layout_width="70dp"
        android:layout_height="wrap_content"
        android:textColor="@color/primary_dark_material_dark"
        android:text="Text 3"/>

    <TextView
        android:layout_width="70dp"
        android:layout_height="wrap_content"
        android:textColor="@color/primary_dark_material_dark"
        android:text="Text 4"/>
</LinearLayout>
RelativeLayout
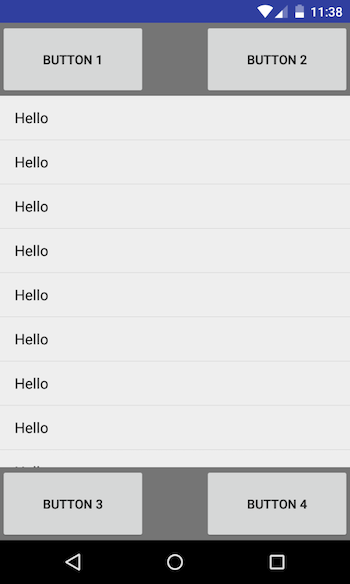
In This ViewGroup you can arrange the Views in relative fashion. Lets say you have a TextView and an EditTextView you want to keep TextView in left of EditTextView. You can just say that EditTextView will be on the right of TextView using one of the RelativeLayout attributes.
Attributes of RelativeLayout
android:layout_alignParentTop - use this attribute to fix the View at the top of the RelativeLayout android:layout_alignParentLeft - use this attribute to align View on the left android:layout_alignParentRight - use this attribute to align View on the right android:layout_alignTop - use this attribute to align View on the top of some other view android:layout_alignBottom - use this attribute to align View on the bottom of some other view android:layout_alignStart - use this attribute to align View on the start of some other view android:layout_alignEnd - use this attribute to align View on the start of some other view
Example
1
2
3
4
5
6
7
8
9
10
11
12
13
14
15
16
17
18
19
20
21
22
23
24
25
26
27
28
29
30
31
32
33
34
35
36
37
38
39
40
41
42
43
44
45
46
47
48
49
50
51
52
53
54
55
<?xml version="1.0" encoding="utf-8"?>
<RelativeLayout
    xmlns:android="http://schemas.android.com/apk/res/android"
    xmlns:tools="http://schemas.android.com/tools"
    android:layout_width="match_parent"
    android:layout_height="match_parent"
    android:orientation="vertical"
    tools:context="ajitsingh.com.androiduiplayground.DemoActivity">

    <RelativeLayout
        android:layout_width="match_parent"
        android:layout_height="80dp"
        android:id="@+id/buttons"
        android:layout_alignParentTop="true"
        android:background="@color/primary_dark_material_light">

        <Button
            android:layout_width="160dp"
            android:layout_height="match_parent"
            android:layout_alignParentLeft="true"
            android:text="Button 1"/>

        <Button
            android:layout_width="160dp"
            android:id="@+id/a"
            android:layout_height="match_parent"
            android:layout_alignParentRight="true"
            android:text="Button 2"/>
    </RelativeLayout>

    <ListView
        android:layout_width="match_parent"
        android:layout_height="wrap_content"
        android:layout_below="@+id/buttons"
        android:entries="@array/dummy_list"/>

    <RelativeLayout
        android:layout_width="match_parent"
        android:layout_height="80dp"
        android:layout_alignParentBottom="true"
        android:background="@color/primary_dark_material_light">

        <Button
            android:layout_width="160dp"
            android:layout_height="match_parent"
            android:layout_alignParentLeft="true"
            android:text="Button 3"/>

        <Button
            android:layout_width="160dp"
            android:layout_height="match_parent"
            android:layout_alignParentRight="true"
            android:text="Button 4"/>
    </RelativeLayout>
</RelativeLayout>
AbsoluteLayout
This Layout is deprecated. It is used to fix Views position on the screen. Now you can do that using RelativeLayout as shown above.
TableLayout
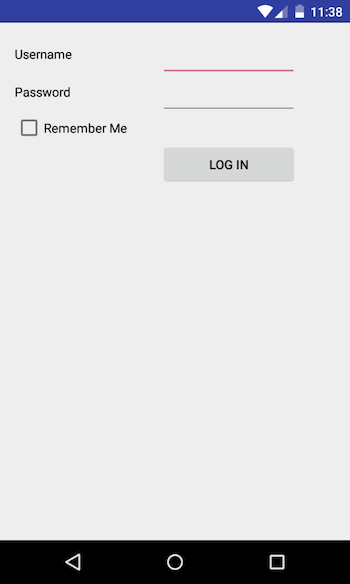
This Layout is used to arrange the Views in tabular fashion. It extends the LinearLayout. Table has as many columns as the row with maximum Views. You can use this layout to design forms etc.
- Table can leave cells empty
- width of the column is defined by the row with the widest cell
- can not change the width as its always match_parent for the TableLayout
- TableRow also extends LinearLayout
Example
1
2
3
4
5
6
7
8
9
10
11
12
13
14
15
16
17
18
19
20
21
22
23
24
25
26
27
28
29
30
31
32
33
34
35
36
37
38
39
40
41
42
43
44
45
46
47
48
49
50
51
52
53
54
55
<?xml version="1.0" encoding="utf-8"?>
<TableLayout
    xmlns:android="http://schemas.android.com/apk/res/android"
    xmlns:tools="http://schemas.android.com/tools"
    android:layout_width="match_parent"
    android:layout_height="match_parent"
    android:orientation="vertical"
    android:paddingBottom="@dimen/activity_vertical_margin"
    android:paddingLeft="@dimen/activity_horizontal_margin"
    android:paddingRight="@dimen/activity_horizontal_margin"
    android:paddingTop="@dimen/activity_vertical_margin"
    tools:context="ajitsingh.com.androiduiplayground.DemoActivity">

    <TableRow
        android:layout_width="match_parent"
        android:layout_height="wrap_content">
        <TextView
            android:layout_width="160dp"
            android:layout_height="wrap_content"
            android:text="Username"
            android:textColor="@color/primary_dark_material_dark"/>

        <EditText
            android:layout_width="150dp"
            android:layout_height="wrap_content"
            android:textColor="@color/primary_dark_material_dark"/>
    </TableRow>

    <TableRow
        android:layout_width="match_parent"
        android:layout_height="wrap_content">
        <TextView
            android:layout_height="wrap_content"
            android:text="Password"
            android:textColor="@color/primary_dark_material_dark"/>

        <EditText
            android:layout_height="wrap_content"
            android:textColor="@color/primary_dark_material_dark"/>
    </TableRow>

    <TableRow
        android:layout_width="match_parent"
        android:layout_height="wrap_content">
        <CheckBox
            android:text="Remember Me"/>
    </TableRow>

    <TableRow
        android:layout_width="match_parent"
        android:layout_height="wrap_content">
        <TextView/>
        <Button android:text="Log In"/>
    </TableRow>
</TableLayout>
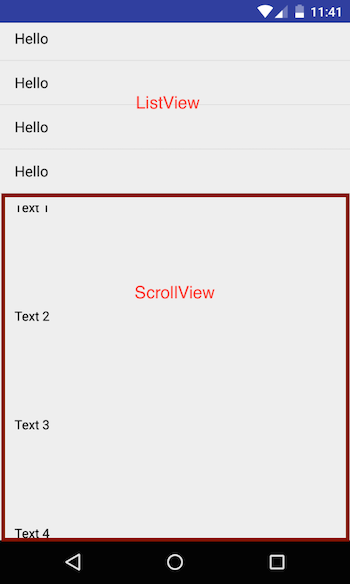
ScrollView
By default you can not scroll the android screen. If you want to make the screen scrollable, you have to encapsulate your ViewGroup in ScrollView. ScrollView can have only one direct child. Let’s say you want to have multiple LinearLayout within ScrollView, that is not possible. Android will through an exception saying
1
2
3
4
5
6
7
8
9
10
java.lang.IllegalStateException: ScrollView can host only one direct child
	at android.widget.ScrollView.addView(ScrollView.java:266)
	at android.view.LayoutInflater.rInflate_Original(LayoutInflater.java:810)
	at android.view.LayoutInflater_Delegate.rInflate(LayoutInflater_Delegate.java:64)
	at android.view.LayoutInflater.rInflate(LayoutInflater.java:782)
	at android.view.LayoutInflater.rInflate_Original(LayoutInflater.java:809)
	at android.view.LayoutInflater_Delegate.rInflate(LayoutInflater_Delegate.java:64)
	at android.view.LayoutInflater.rInflate(LayoutInflater.java:782)
	at android.view.LayoutInflater.inflate(LayoutInflater.java:504)
	at android.view.LayoutInflater.inflate(LayoutInflater.java:385)
So, always keep only one Direct child under the ScrollView. Also do not use ListView inside the ScrollView, because ScrollView provides infinite scrolling so if you want to render ListView inside ScrollView, it will render the whole list first and then the other elements which defeats the purpose of android ListView which is optimised to load the content on scroll. If you want to keep ListView, put it outside of ScrollView.
Example
1
2
3
4
5
6
7
8
9
10
11
12
13
14
15
16
17
18
19
20
21
22
23
24
25
26
27
28
29
30
31
32
33
34
35
36
37
38
39
40
41
42
43
44
45
46
47
48
49
50
51
52
53
54
55
56
57
58
59
60
61
62
63
64
65
66
67
<?xml version="1.0" encoding="utf-8"?>
<LinearLayout
    xmlns:android="http://schemas.android.com/apk/res/android"
    android:layout_width="match_parent"
    android:layout_height="match_parent"
    android:orientation="vertical">

    <ListView
        android:layout_width="match_parent"
        android:layout_height="200dp"
        android:entries="@array/dummy_list"/>

    <TextView
        android:layout_width="match_parent"
        android:layout_height="2dp"
        android:layout_marginBottom="10dp"
        android:background="@color/primary_dark_material_dark"/>

    <ScrollView
        xmlns:android="http://schemas.android.com/apk/res/android"
        android:layout_width="match_parent"
        android:layout_height="match_parent">
        <LinearLayout
            android:layout_width="match_parent"
            android:layout_height="match_parent"></LinearLayout>

        <LinearLayout
            xmlns:android="http://schemas.android.com/apk/res/android"
            xmlns:tools="http://schemas.android.com/tools"
            android:layout_width="match_parent"
            android:layout_height="match_parent"
            android:orientation="vertical"
            android:paddingBottom="@dimen/activity_vertical_margin"
            android:paddingLeft="@dimen/activity_horizontal_margin"
            android:paddingRight="@dimen/activity_horizontal_margin"
            android:paddingTop="@dimen/activity_vertical_margin"
            tools:context="ajitsingh.com.androiduiplayground.DemoActivity">

            <TextView
                android:layout_width="70dp"
                android:layout_height="wrap_content"
                android:paddingBottom="400dp"
                android:text="Text 1"
                android:textColor="@color/primary_dark_material_dark"/>

            <TextView
                android:layout_width="70dp"
                android:layout_height="wrap_content"
                android:paddingBottom="400dp"
                android:text="Text 2"
                android:textColor="@color/primary_dark_material_dark"/>

            <TextView
                android:layout_width="70dp"
                android:layout_height="wrap_content"
                android:paddingBottom="400dp"
                android:text="Text 3"
                android:textColor="@color/primary_dark_material_dark"/>

            <TextView
                android:layout_width="70dp"
                android:layout_height="wrap_content"
                android:text="Text 4"
                android:textColor="@color/primary_dark_material_dark"/>
        </LinearLayout>
    </ScrollView>
</LinearLayout>
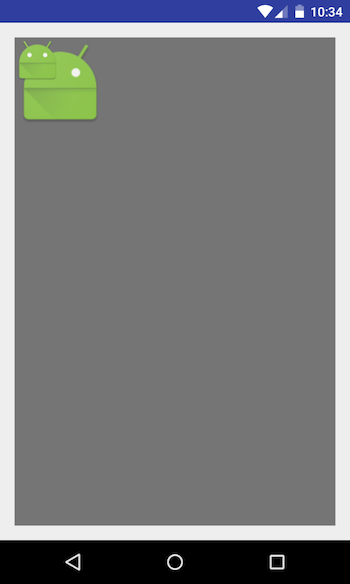
FrameLayout
This is a special layout which is mostly used to render one View. The View which you add to the FrameLayout will be added to the top left corner. If you try rendering multiple views, they will be stacked on each other. And still if you want to add multiple views you have to manually control their position by specifying their gravity.
Example
1
2
3
4
5
6
7
8
9
10
11
12
13
14
15
16
17
18
19
20
21
22
23
24
25
26
27
28
<?xml version="1.0" encoding="utf-8"?>
<FrameLayout
    xmlns:android="http://schemas.android.com/apk/res/android"
    xmlns:tools="http://schemas.android.com/tools"
    android:layout_width="match_parent"
    android:layout_height="match_parent"
    android:orientation="vertical"
    android:paddingBottom="@dimen/activity_vertical_margin"
    android:paddingLeft="@dimen/activity_horizontal_margin"
    android:paddingRight="@dimen/activity_horizontal_margin"
    android:paddingTop="@dimen/activity_vertical_margin"
    tools:context="ajitsingh.com.androiduiplayground.DemoActivity">

    <TextView
        android:background="@color/primary_dark_material_light"
        android:layout_width="match_parent"
        android:layout_height="match_parent"/>

    <ImageView
        android:layout_width="100dp"
        android:src="@mipmap/ic_launcher"
        android:layout_height="100dp"/>

    <ImageView
        android:layout_width="50dp"
        android:src="@mipmap/ic_launcher"
        android:layout_height="50dp"/>
</FrameLayout>
I hope this article was helpful. I will write more about android UI tips and tricks in the upcoming articles. Please comment for any feedback, concern or suggestion, Thanks.