Hello folks, In this article I want to discuss how to test android database. Android database can be tested easily using Instrumentation tests. If you are writing the instrumentation test for the first time then there are few things that you need to setup before getting started with the testing of android database. I have also recorded a series of videos for instrumentation testing tutorials.
How to configure instrumentation
You need to add the following things to the build.gradle file.
1
2
3
4
5
6
7
8
9
10
11
android {
    defaultConfig {
        testInstrumentationRunner "android.support.test.runner.AndroidJUnitRunner"
    }
}
dependencies {
    androidTestCompile 'junit:junit:4.12'
    androidTestCompile('com.android.support.test:runner:0.3') {
        exclude group: 'com.android.support', module: 'support-annotations'
    }
}
testInstrumentationRunner - this is the JunitRunner that will be used to run the instrumentation tests.
androidTestCompile ‘junit:unit:4.14’ - this dependency will make junit available in the instrumentation tests.
androidTestCompile ‘com.android.support.test:runner:0.3’ - this dependency contains few important classes that will be used in the instrumentation tests. We will discuss them whenever they will occur.
Android Instrumentation Testing Series
Now let’s look at an example of Testing Android Database.
DatabaseHelperClass
You can watch the video here
1
2
3
4
5
6
7
8
9
10
11
12
13
14
15
16
17
18
19
20
21
22
23
24
25
public class DatabaseHelper extends SQLiteOpenHelper {
  public static final String DB_NAME = "demo.db";

  public DatabaseHelper(Context context) {
    super(context, DB_NAME, null, 1);
  }

  @Override
  public void onCreate(SQLiteDatabase sqLiteDatabase) {
    sqLiteDatabase.execSQL(ExpenseTypeTable.CREATE_TABLE_QUERY);
  }

  @Override
  public void onUpgrade(SQLiteDatabase sqLiteDatabase, int oldVersion, int newVersion) {

  }

  public void addExpenseType(ExpenseType type) {
    SQLiteDatabase database = this.getWritableDatabase();
    ContentValues values = new ContentValues();
    values.put(ExpenseTable.TYPE, type.getType());

    database.insert(ExpenseTypeTable.TABLE_NAME, null, values);
  }
}
This databaseHelper just have one method which is to add more expense types. Our aim is to test this method. Let’s take a look at the test.
DatabaseHelperTest
Complete code is availabe on github.
1
2
3
4
5
6
7
8
9
10
11
12
13
14
15
16
17
18
19
20
21
22
23
24
25
26
27
28
29
30
31
32
import static android.support.test.InstrumentationRegistry.getTargetContext;
import android.support.test.runner.AndroidJUnit4;

import static org.hamcrest.core.Is.is;
import static org.junit.Assert.assertThat;
import static org.junit.Assert.assertTrue;

@RunWith(AndroidJUnit4.class)
public class DatabaseHelperTest {

  private DatabaseHelper database;

  @Before
  public void setUp() throws Exception {
    getTargetContext().deleteDatabase(DatabaseHelper.DB_NAME);
    database = new DatabaseHelper(getTargetContext());
  }

  @After
  public void tearDown() throws Exception {
    database.close();
  }

  @Test
  public void shouldAddExpenseType() throws Exception {
    database.addExpenseType(new ExpenseType("Food"));

    List<String> expenseTypes = database.getExpenseTypes();
    assertThat(expenseTypes.size(), is(1));
    assertTrue(expenseTypes.get(0).equals("Food"));
  }
}
In the above test first of all we are dropping the database to make sure we don’t have stale data in the database. Then we are creating the DatabaseHelper instance using InstrumentationRegistry.getTargetContext().
Then in the test we are adding a new ExpenseType and verifying that the record is added successfully in the database.
We are using AndroidJUint4.class to run the instrumentation tests because we want to write the tests in junit4 style. By default instrumentation tests are meant to use junit3 style. This class is provided by com.android.support.test:runner:0.3 package.
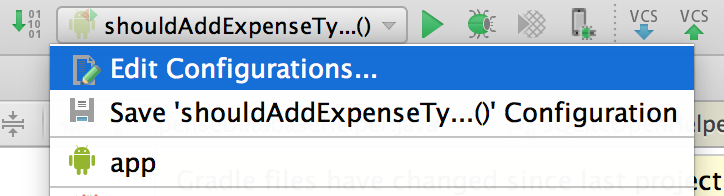
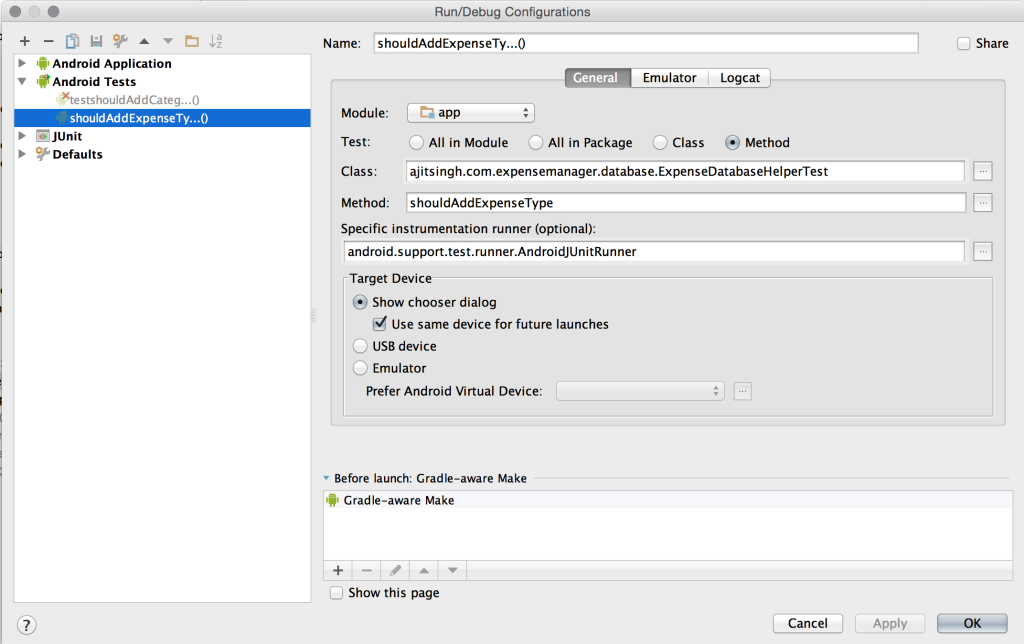
Running Instrumentation Tests
Running from command line - ./gradlew cC
Running from android studio - To run a specific test from android studio use the following configuration.