This article will cover how to use sqlite database with android. For this article I have created a demo application which is available on my github account. The app just has a list view which contains a list of products with its price. We will fetch the products from sqlite database and display it on the screen.
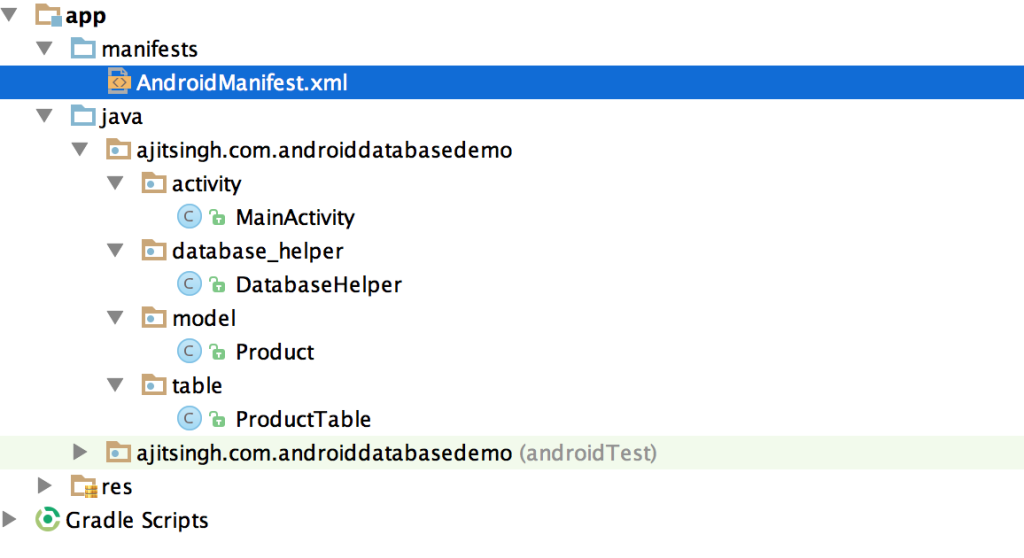
To get started, let’s have a look at the package structure that I used in the code base.

We will start with looking at the ProductTable. The purpose of this class is to have the information about structure of product table in database.
1
2
3
4
5
6
7
8
9
10
11
12
13
14
15
16
17
package ajitsingh.com.androiddatabasedemo.table;

import android.provider.BaseColumns;

public class ProductTable implements BaseColumns {
  public static final String NAME = "name";
  public static final String PRICE = "price";
  public static final String TABLE_NAME = "products";

  public static final String CREATE_QUERY = "create table " + TABLE_NAME + " (" +
      _ID + " INTEGER, " +
      NAME + " TEXT, " +
      PRICE + " INTEGER)";

  public static final String DROP_QUERY = "drop table " + TABLE_NAME;
  public static final String SElECT_QUERY = "select * from " + TABLE_NAME;
}
android.provider.BaseColumns is an interface provided by android which contains nothing but two String variables. By implementing this interface your ProductTable will by default have those two columns.
1
2
3
4
5
6
package android.provider;

public interface BaseColumns {
  String _COUNT = "_count";
  String _ID = "_id";
}
Now let’s take a look at our Product model. Currently its nothing but a POJO like class but it can contain the domain logic of a product.
1
2
3
4
5
6
7
8
9
10
11
12
13
14
15
16
17
18
19
package ajitsingh.com.androiddatabasedemo.model;

public class Product {
  private String name;
  private Integer price;

  public Product(String name, Integer price) {
    this.name = name;
    this.price = price;
  }

  public String getName() {
    return name;
  }

  public Integer getPrice() {
    return price;
  }
}
And now we are about to discuss the most important class of this demo project.
DataBaseHelper is the class which will create the database in the device and will maintain it using versions. This class is extended from SQLiteOpenHelper which handles the core database stuff internally for us.
DataBaseHelper has mainly two methods:
-
onCreate- This method is called first time when you create the DataBaseHelper object. And you can specify what are the tables you want to create in it or any sort of database operations that you would like to do. This method gets called only once when you first install the applications. In our implementation of onCreate method, we are seeding the products in product table. -
onUpgrade- This method is used for updating the database and bumping up the version of database. Once you bump up the version and user upgrades the app and starts it then this method will be called.
1
2
3
4
5
6
7
8
9
10
11
12
13
14
15
16
17
18
19
20
21
22
23
24
25
26
27
28
29
30
31
32
33
34
35
36
37
38
39
40
41
42
43
44
45
46
47
48
49
50
51
52
53
package ajitsingh.com.androiddatabasedemo.database_helper;

import android.content.ContentValues;
import android.content.Context;
import android.database.Cursor;
import android.database.sqlite.SQLiteDatabase;
import android.database.sqlite.SQLiteOpenHelper;

import java.util.List;

import ajitsingh.com.androiddatabasedemo.model.Product;
import ajitsingh.com.androiddatabasedemo.table.ProductTable;

import static java.util.Arrays.asList;

public class DatabaseHelper extends SQLiteOpenHelper{
  public DatabaseHelper(Context context) {
    super(context, "Retail", null, 1);
  }

  @Override
  public void onCreate(SQLiteDatabase sqLiteDatabase) {
    sqLiteDatabase.execSQL(ProductTable.CREATE_QUERY);
    seedProducts(sqLiteDatabase);
  }

  @Override
  public void onUpgrade(SQLiteDatabase sqLiteDatabase, int prevVersion, int newVersion) {
    sqLiteDatabase.execSQL(ProductTable.DROP_QUERY);
    sqLiteDatabase.execSQL(ProductTable.CREATE_QUERY);
  }

  private void seedProducts(SQLiteDatabase sqLiteDatabase){
    List<Product> products = asList(
        new Product("T.V", 5000),
        new Product("A.C", 15000),
        new Product("Washing Machine", 10000),
        new Product("Refrigerator", 13000),
        new Product("Microwave", 4000));

    for (Product product : products) {
      ContentValues values = new ContentValues();
      values.put(ProductTable.NAME, product.getName());
      values.put(ProductTable.PRICE, product.getPrice());

      sqLiteDatabase.insert(ProductTable.TABLE_NAME, null, values);
    }
  }

  public Cursor getProductCursor() {
    return this.getWritableDatabase().rawQuery(ProductTable.SElECT_QUERY, null);
  }
}
Now let’s see what we have in our MainActivity class. In our Activity we are creating an instance of DataBaseHelper and asking it for product’s cursor.
databaseHelper.getProductCursor() - this method queries the products table and returns a cursor object which contains all the records of that table.
SimpleCursorAdapter - This is the adaptor we use when we have to directly pick the records from the database and display it in the list. It requires five arguments to create an instance of itself.
- Context - Application context or Activity.
- A Layout file, which you want use in each row of the ListView.
- Cursor - to load data from database.
- from - these are the column names where you want to get the data from.
- to - these are the layout elements present in the
R.layout.product_rowwhere you want to show the data of from columns.
1
2
3
4
5
6
7
8
9
10
11
12
13
14
15
16
17
18
19
20
21
22
23
24
25
26
27
package ajitsingh.com.androiddatabasedemo.activity;

import android.app.Activity;
import android.os.Bundle;
import android.widget.ListView;
import android.widget.SimpleCursorAdapter;

import ajitsingh.com.androiddatabasedemo.R;
import ajitsingh.com.androiddatabasedemo.database_helper.DatabaseHelper;
import ajitsingh.com.androiddatabasedemo.table.ProductTable;


public class MainActivity extends Activity {

  @Override
  protected void onCreate(Bundle savedInstanceState) {
    super.onCreate(savedInstanceState);
    setContentView(R.layout.activity_main);
    ListView productList = (ListView) findViewById(R.id.products_list);

    DatabaseHelper databaseHelper = new DatabaseHelper(this);
    String[] from = new String[] {ProductTable.NAME, ProductTable.PRICE};
    int[] to = new int[] {R.id.product_name, R.id.product_price};

    productList.setAdapter(new SimpleCursorAdapter(this, R.layout.product_row, databaseHelper.getProductCursor(), from, to));
  }
}
If you want to have a look at the resource files then probably you can clone my repo or you can take a look at it on the github itself.


